|
Before we begin this post, I wanted to let you all know that we are now on Youtube! We filmed a house tour back in 2018 when we first bought the house! Now we have posted it so that we can all look back on how far we've come! I'll be posting an updated house tour in the weeks to come (I promise, our camera work has come a lnog way!) But for now, you can check the video out and subscribe by clicking HERE! When we first got to Jameswood, the house was an absolute disaster. With so much seemingly wrong with the building, it was hard to know where to start. We quickly decided a structural engineer's survey of the house would be needed - in order to find out exactly what was wrong with the building, and how to fix it! Commissioning this report was one of the best starting points we had for tackling our renovation. For self builders who are interested: Ours cost about 500 pounds and was really worth every penny. If you are ever taking on a restoration or investing in property of any kind, I would highly recommend getting a structural survey done to the house!
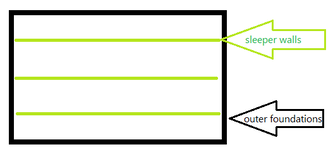
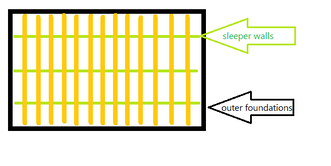
When our report came back to us, it obviously didn't say that Jameswood had a clean bill of health. The structural engineer had even gone as far as to say that it would be easier to knock her down and start over. Thankfully, however, our structural report did find one thing that wasn't wrong with our home: her main foundations. Our engineer told us that the main foundations were sturdy, and built onto solid, unmoving ground, (With no evidence of any rivers running underneath it…!) But, unfortunately, this could only be said for our main foundations. Our engineer was worried about our sleeper walls. Sleeper walls are a set of foundations that run parallel to each other, from gable-end to gable-end, every few meters below a building. They are separate from the outer foundations, which uphold the solid stone walls of a home.
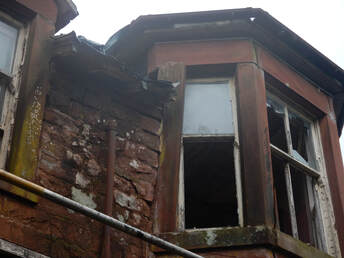
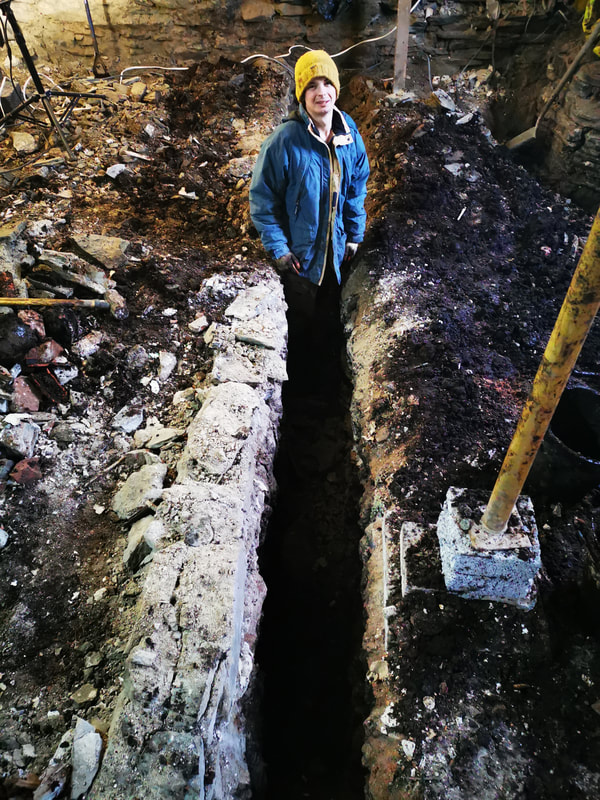
The sleeper walls hold up the ground floor joists in a suspended floor system. In the Victorian era, it was not uncommon for the sleeper walls to consist of a few feet of stone wall sat on top of the surface soil. This was unlike the deeper outer wall foundations, which would be dug into the ground and sat on a firmer layer of ground far below the surface soil. At Jameswood, the surface soil our sleeper walls sat on is particularly…squidgy… for lack of a better word! Over time, the weight of the ground floor compacted the muddy surface soil beneath the sleeper walls, and the floor slowly started to sink. 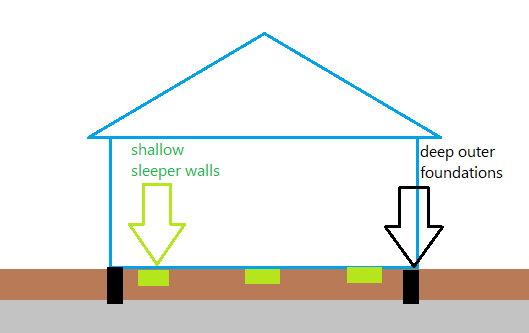 As it turns out, this problem was one of the reasons for the partial collapse of the bay window! As the roof was left unrepaired, and timber started to rot, the trusses were bending under their own weight. This problem was compacted by the sinking floor, which meant the roof was no longer receiving any structural support from the walls below! The roof eventually bent out of place, and pushed out stones in the bay window! Before we could add any new timber framing into the building, we would need to replace the shallow sleeper walls with deep concrete foundations. 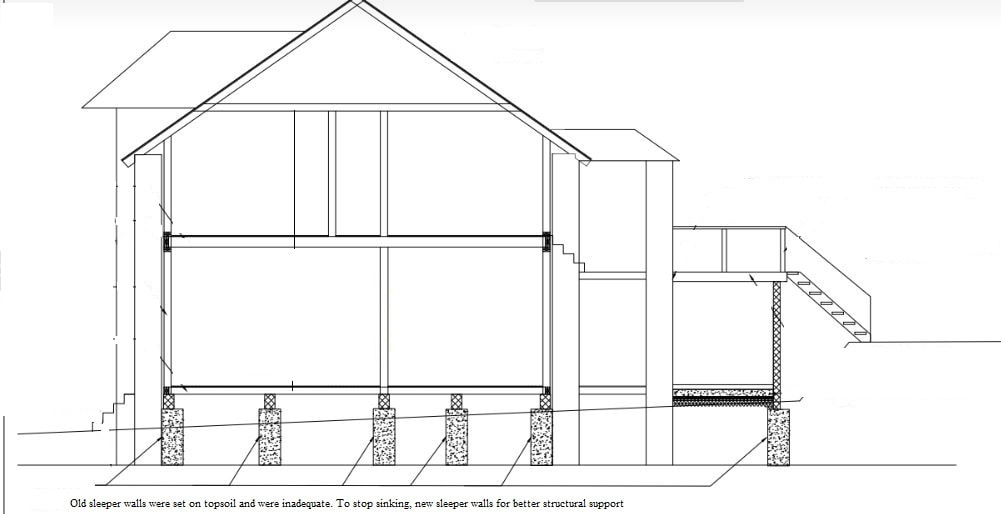 "Old sleeper walls were set on topsoil and were inadequate. To stop sinking, new sleeper walls will be constructed for better support." A digger would usually excavate trench foundations, but there was no way we were getting one in through the doorways, and we wouldn’t want heavy machinery disturbing the outer foundations. We had no choice but to hand-dig our new foundations. Unlike many parts of our project, we didn't have anyone to help us with this task. It was the winter months, and it was far too cold to host friends and family. From test holes, we knew that the firm till we would be setting our foundations onto was about one meter below the grounds surface. Wheel-barrow by wheel-barrow, we set out to dig long, deep trenches inside our home. 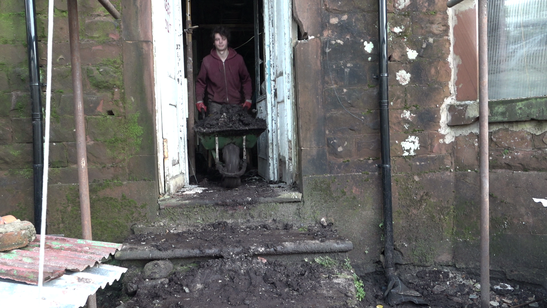 Wheel-barrow by wheel-barrow, we set out to dig our foundations by hand.
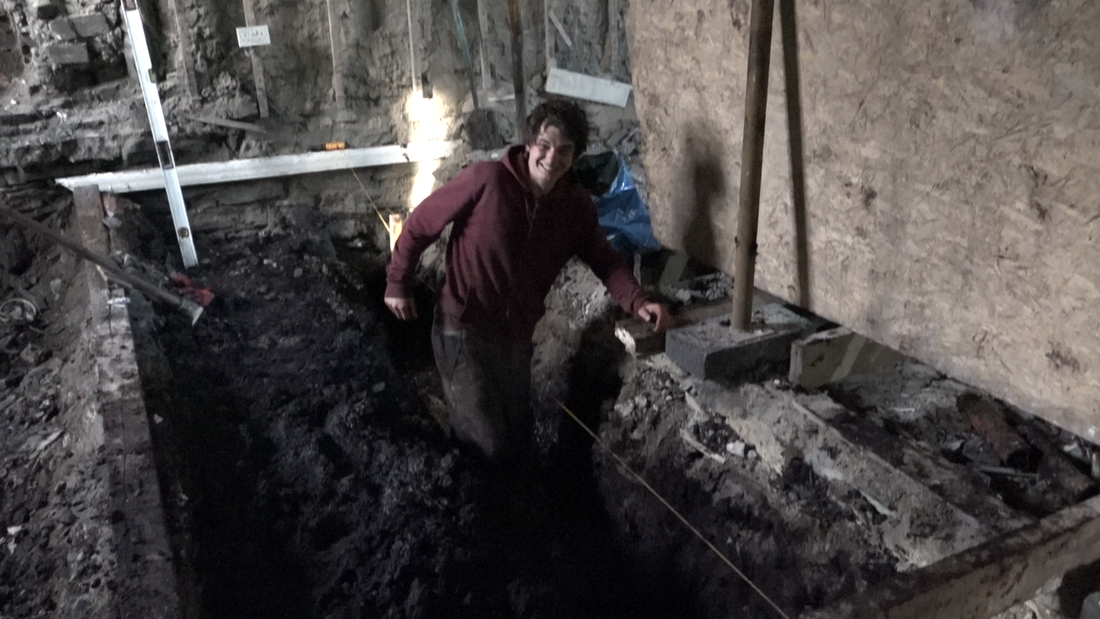 He still managed to keep a smile on his face! Cal and I took turns digging and wheel-barrowing mud out of the building. Admittedly, Cal would take on the digging job as the trench went deeper, and allow me the more satisfying task of digging the first few feet of trench, where the mud was drier and you were stood at wheel-barrow height while working. 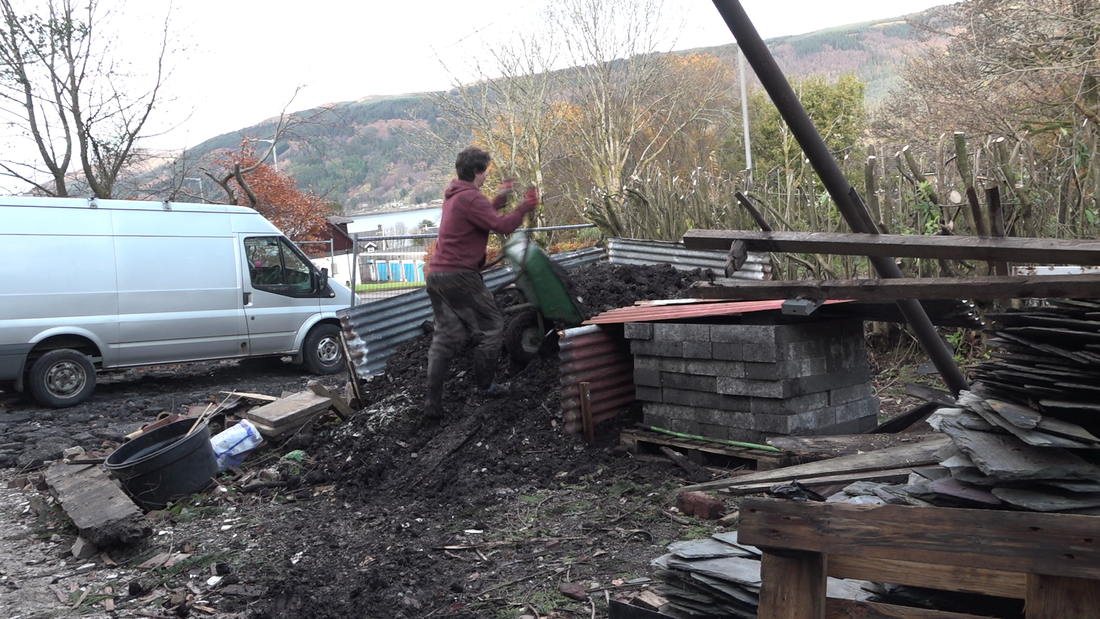 The pile of soil grew outside, as we dug away the "squidgy" mud that our sleeper walls had sat on. The work kept us warm, and we certainly grew stronger as the weeks progressed. Finally, we managed to dig all the trenches out. Filling them back in with concrete was an equally difficult task, but when we had poured all of our foundations and stepped on solid concrete for the first time, a relief washed over us. 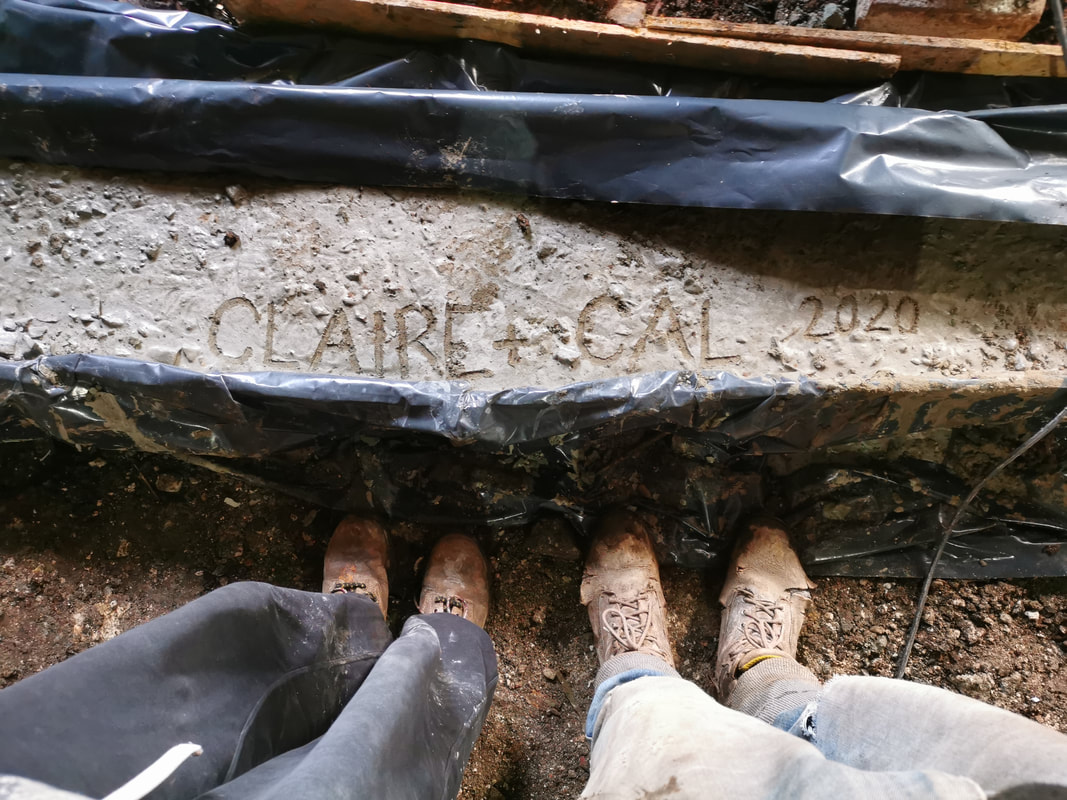 For most moments in our project, I can look back at times with fondness. Even if the going got a bit tough, we managed to have fun while doing it. But that just isn’t the take-away message for this piece of the project... I never want to dig another trench again in my life! Looking back on this time in our project, I am amazed that we had the strength to push through and I am so proud of us for persevering. But I am even more happy that it's all over! Now, with solid foundations that will stand the test of time, we are off the ground, and can truly start rebuilding home. Thank you for following our journey, as we restore Jameswood Villa. Claire  What Have We Dunoon Blog by Claire Segeren is licensed under a Creative Commons Attribution 4.0 International License. Based on a work at whathavewedunoon.weebly.com.
30 Comments
Susan Seidel-Hood
11/20/2020 12:53:46 am
Wow! Your strength of character is inspirational... Wishing you all the best for the next stage.xx 11/21/2020 07:59:34 am
As usual, I am amazed by your progress. But I pretty much knew you had a handle on anything Jameswood could throw at you, when you hand dug trenches to drain the property. You're exceptional!
Bonnie Phipps
11/23/2020 10:03:34 am
This daunting task no doubt has changed your lives can’t imagine anything you two could not conquer. Not only you but the many followers who are inspired by your determination. I think the secret is keeping the goal always in your mind and heart!!
Gloria Dick
11/29/2020 02:14:23 pm
Your determination and stamina and second two none. I have just come across your site and have spent the last hour reading your posts. Kudos to the both of you. Looking forward to the rest of your James wood journey!
Betty L Shelton
12/4/2020 11:42:46 am
Think of all the hard work this way-the foundation of your home is like the foundation of a good relationship.Not easy but worth the effort. 12/5/2020 10:35:11 am
Nice Blog !! Great read and loved your views about restoration.
M.✓
12/6/2020 04:10:38 am
Antes de todo este gran esfuerzo tenian que empezar por abajo y avisar a un tecnico. Vaya manera de desperdiviar tiempo y dinero.
Ken Cremer
12/6/2020 07:21:53 pm
Your squishy sticky mud sounds like clay soil that my son in law and I have been batteling. It does eat boots and when dried on boots requires hammer and chisel to remove it Reading your blog has been quite entertaining considering my retirement "project." My daughter and her husband are building a house near Steamboat Springs, Colorado, in the Rocky Mountains. Their clay soil expands in winter and spring when snow melt saturates the soil. In summer it dries out and cracks and shrinks. Engineering reports on soils led to unexpected requirements for foundations that were quite expensive. When their foundation was poured, it had 2 feet thick footers that were 3 feet wide at the base. The footers were 10 feet deep, below the freeze line depth. Cement walls 1 foot thick and 8 feet tall with reinforcing rods were then poured into foundation forms. Our ground is frozen for six months November thru April. It's a long snowy cold winter so work progresses slowly for do it yourself builders. Good luck in finishing your dream home.
John Schutt
12/7/2020 06:42:14 am
Great work. Lots and lots of great work. Tiring work. Hard work. But great work nonetheless.
Laura Ciampa
12/8/2020 08:11:42 am
Wow! I knew you had accomplished alot , just didn't realize (until reading this) the extent of your efforts. You are truly amazing! 12/16/2020 10:56:06 am
Wow! It's always a great inspiration to read of your Herculean efforts and the successes that you've achieved through hard work and perseverance in bringing this beautiful old home back to life!! 12/17/2020 07:16:08 am
Progress report and all time is ensured for the changes. Implication of the report on the top of the cycles. The fitness is issued for the changed terms for the funded data for the fixing of the goals for people.
Day Murphy
1/26/2021 10:49:33 am
I just discovered your story and have spent most of the day getting caught up on your progress. 7/12/2021 04:40:22 am
The facts that have been discussed here are really important. Thank you so much for sharing a great post. 7/12/2021 04:43:53 am
Good article with an excellent way of presentation. Keep it up. Thanks for sharing. 8/10/2021 11:28:18 am
I’ve just found your story and read all your blogs. What an amazing achievement, and delightful couple. My son and his partner bought a property in Bulgaria and have spent a few years doing all the repairs themselves. They also have a blog. I very much look forward to hearing more. xxx 3/9/2022 12:04:15 pm
It was not uncommon for the sleeper walls to consist of a few feet of stone wall sat on top of the surface soil. I truly appreciate your great post! 3/9/2022 03:25:23 pm
The trusses were bending under their own weight. This problem was compacted by the sinking floor, Thank you, amazing post! 6/3/2022 11:47:38 am
This was unlike the deeper outer wall foundations, which would be dug into the ground and sat on a firmer layer of ground far below the surface soil. Thank you for making this such an awesome post! 1/26/2023 08:15:09 am
Sleeper walls are a series of foundations that are parallel to one another, from gable end to gable end, each meter below the building. They're typically employed to help support the weight of the building as well as to ensure stability. In some instances they could also be used to against lateral forces like earthquakes or wind loads. 1/8/2024 04:27:53 am
It's fascinating to learn about the challenges faced with Jameswood's foundations and how a structural engineer's survey played a crucial role. The details about sleeper walls and the impact on the bay window illustrate the complexity of the renovation process. 1/17/2024 07:03:56 am
he importance of a structural engineer's survey in home renovations is emphasized here. The insights into Jameswood's foundation issues provide valuable lessons for others undertaking restoration projects. 1/22/2024 04:47:39 am
It's great to follow your home renovation journey, and the YouTube house tour adds a fantastic visual dimension. Thanks for keeping us updated on the progress, and looking forward to more content! 2/4/2024 11:36:23 pm
The detailed explanation of sleeper walls and their impact on the bay window issue adds depth to the renovation process. Hand-digging foundations in winter shows dedication and determination in overcoming obstacles. 4/3/2024 04:04:18 am
It's intriguing to discover the obstacles encountered with Jameswood's foundations and the pivotal role played by a structural engineer's survey. The information about sleeper walls and their effect on the bay window highlights the intricacies of the renovation process. 4/4/2024 09:27:46 pm
It's intriguing to discover the obstacles encountered with Jameswood's foundations and the pivotal role played by a structural engineer's assessment. The information regarding sleeper walls and their effect on the bay window highlights the intricacies of the renovation procedure. 5/6/2024 12:14:15 am
The struggle with the sleeper walls sounds like a challenging but necessary hurdle to overcome. Hand-digging new foundations in the winter months sounds like a daunting task, but it's great to see your dedication to ensuring the stability of your home. Leave a Reply. |